Description
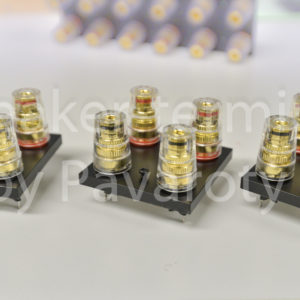
Refined conversion kit for YAMAHA M65
12 high-quality clamps fixed on 3 very solid plates and already mounted on a circuit board.
It does not get any easier – no mechanical adjustments necessary! Only 9 strands have to be soldered from the old to the new PCB.
Mounting screws are included.


Robert Easter –
I have the “YAMAHA M65 Speaker terminal incl. printed circuit board” installed in my Yamaha M-65 for about 1 year now, and I am very satisfied. I recommend this part to anyone refurbishing a Yamaha M-65, and the M-65 is well worth refurbishing. The quality of this terminals+PCB part is high, and feels very solid and heavy. This kind of terminal can take thick bare wires or banana plugs.
I really like the M-65, so I also recapped the whole M-65 amp, except for the four big caps, using ELNA Silmic II caps purchased from one of the well-known online electronics parts stores. These new terminals make it perfect. Though I forgot, it is probably a good idea to replace the relay too – but mine is still working for now.
I also checked all of the fusible/safety resistors (there are 65 of them) with a DMM. They were still all okay. Two of these fusibles that are close to the big 1000uF caps are a good idea to replace if you can find exact replacements, because those two are the most trouble. You might benefit from cleaning/bush/scaping away the glue around the 1000uF caps and trying to remove any corrosion/rust on some of the nearby power rails close to the center of the main PCB. Actually, it is a good idea to open under the amp and get to the underside of the main PCB and clean the whole top/bottom of the main PCB of old encrusted rosin or any other debris. I was cleaning the underside of the main PCB and found some clipped off lead wire stuck in a few places close to the underside of the relay. I’m lucky those pieces of lead wire did not cause a bad short. Specifically, I had to scrap away old rosin around the transistor soldering leads. The really old rosin crust could potentially conduct some static charges across leads, causing distortions – so crap it away (also in some places on the top of the board). Anyhow, I cleaned up board is a good idea, and I think it can help. Some old level knobs can sound scratchy when turned, and it is a good idea to “exercise” them by turning them a lot, through full range, until the scratchy sounds while turning them (if any) work out and become smooth.
I also replaced all four trimmers (two on main PCB and two on meter PCB) with some good Bourns trimmers. These require following the service manual instructions to adjust them. With new ELNA capacitors everywhere, the trimmers will need readjustment a few times every few months etc. as the caps fully reform and their performance settles. Bad trimmer adjustment will be bad sound. With good adjustment, the amp sounds very nice even with Auto Class A off, saving a lot of power and heat. Running with Auto Class A is probably not the best idea for most of the time.
My original terminals were broken, and the PCB was cracked with a really sloppy soldering pair.
The original Yamaha terminals PCB did not have the film capacitors installed, but it had the places where they should have been installed. This new PCB has these film capacitors installed. Why the original PCB did not have them installed, I do not know – maybe just to save costs. The terminals PCB film capacitors, I think, provide extra protection to the amp and speakers by draining/filtering away very high frequencies that only heat up amps and burn up speakers. I’m glad the caps are there; they are part of the original PCB design, as seen in the service manual.
Packaging and delivery were excellent. It was shipped out within a few days of the order without delay (maybe it was the next day). So, excellent product and service. Thanks!
Purchase not verified. Find out more